Keen to start a blog?
Blogging made us homeless.
… But not in the typical sense.
Here’s how it all began…
Can I ask you a quick question? Have you ever let a life-changing opportunity pass you by because your desired result seemed too difficult to reach?
Chances are, you have. In fact, I think we all have at some point in our lives. But you know what? I believe today’s going to be different.
My name is Hannah, I’m the Co-founder of this travel blog and, as you may have guessed, a total travel addict.
Deciding to start a blog was possibly THE biggest turning point in my life…
I literally started a blog just so I could continue traveling with the love of my life, a slightly hippy looking Brazilian guy who I met in Thai guesthouse one night.
And as weird or funny as that actually sounds, over 4 years down the track we’re still traveling the world together full time, with the addition of a beautiful, curious little nomad in tow (and yes, our style has evolved along the course).
So the initial idea was to start this blog, share some cool insights and interesting stories from around the world, and in doing so, gain some sort of an audience and eventually earn an income from it so I could keep on traveling with Dan.
And that’s exactly what happened.
Because you see, Dan – that’s my mystery Brazilian man by the way – had already been earning an income online while traveling for 5 years by then, so we knew it was totally possible for me to do the same.
Now, over 4 years later, our blog still continues to help fund our travels. Of course it’s not our only source of income… In fact, it’s only a small part of a much bigger game we’re running (with over 20 employees and 2 office bases) which all began with a few simple websites as well…
I’m not saying any of this to brag. It’s merely to show you that contrary to what many people think, you certainly can make good money blogging, not to mention the amazing opportunities that can come of it (as we’ve experienced first hand).
You see, blogs aren’t just for journalists, authors or professional writers (although I used to think so). They’re for people just like me and you, who want to take what we’re passionate about and use it to create a positive impact on the world.
Back in 2013 I dropped out of university and quit my job to pursue a life of full-time travel with the person I loved (still do!,) while I made an income online.
It happened…
It’s still happening…
But unfortunately, while we always do our best to inspire and encourage you to go out and pursue your travel dreams, we often find that many people give up because the process of starting an online business (or even just the blog) seems too complex.
But it’s not. And I’ll get to that in a minute.
If you’re anything like us, you value your freedom. You value your time. And you value those unique opportunities to live life to the fullest.
Blogging caters to this.
It seriously has to be one of the best jobs in the world!
From being able to travel when and where you like without a traditional job holding you back…
To building your own online business and earning an income from anywhere…
To reaching and helping an endless number of people around the world with your knowledge and insights…
What job could be more freeing and rewarding at the same time?
It’s halfway through 2018, times are changing. More and more jobs are being replaced by robots and online systems. Don’t get left behind!
Technology is evolving at a rapid rate. It’s important to keep up (even better, stay one step ahead of the rest) and use this technology to your advantage…
Otherwise, in a few years to come it could be your job on the line and you’ll to be left stuck, wondering how in the hell you’re going to make it in a digital world now that everyone else has dominated the market.
Be aware and take action while you have the chance because it’s only a matter of time before everyone else wakes up and realises they need to be building their own empires, not someone else’s to succeed for years to come.
And hey, just because I’m talking about blogging and traveling in the same post, it doesn’t at all mean you have to become a “travel blogger”. There’s money to be made in just about any niche!
So here I want to show you how you can start your own self-hosted blog, as cheap as possible without it looking terrible, so you can begin living your life to the fullest…
ON YOUR OWN TERMS!
“But Hannah, I’m not very good at writing…”
“I’m totally tech un-savvy…”
“I have no idea how to make money online…”
I really do get all the things running through your head right now, but here’s the truth…
Research has shown that an effective blog post, as in one that engages and persuades a reader to take your desired call to action, is best written at grade 6 level.
So if you passed grade 6, congratulations, you can run a blog!
Not only that, by starting your blog the way I’m about to show you – which takes less than 10 minutes – you won’t have to deal with any coding or headache causing technical malarky…
Because WordPress handles all that for you.
All you’ve got to do is fill in the blanks where it tells you to.
4 years into blogging I can confidently tell you that the whole process, from starting your blog to posting on it, is so easy.
But let’s rewind to 2013, before I started StoryV Travel & Lifestyle, in fact before I had any clue how this whole blogging thing worked…
I literally thought you had to be a qualified journalist with some kind of a license to run a blog.
I thought that all bloggers were hired by larger media corporations and that’s how they earned an income!
Then when I started traveling, I realised I needed a remote job to make money on the road, so I began applying for freelance jobs online.
I thought I had found the perfect job for me – a social media management gig – so I applied in rapid form.
The next day, the employer got back with an important question…
“How experienced are you in managing and growing Facebook business pages?”
Without giving it much thought I replied with something along the lines of…
“Well, I don’t have any previous experience with Facebook business pages but I go on Facebook a lot so I’m sure I can handle the job…”
Needless to say, I didn’t hear back…
So, I moved onto plan B. B for blogging. And let me tell you now, I’m so happy I did.
Remember earlier on I asked you if you’ve ever let a life-changing opportunity pass you by because your desired result seemed too difficult to reach?
Well, now is one of those time’s a life-changing opportunity is swinging your way and you don’t need to worry about the difficult technical bits that usually get in the way.
All you need to do is follow these next simple steps, click a few buttons and voila, by the end of this tutorial you’ll have your own blog live to world and ready to make a huge impact on not only your own life, but the lives of countless others all around the world as well.
So are you ready to get started? Just click the button below and we’ll go through the process together, one step at a time. I’ll be right here with ya!
By the way, blog hosting normally starts at $7.99 per month but because we’re a Bluehost partner, we can get you started for just $3.95 per month…
That’s like one cup of coffee per month, if you want to get specific. Or a bottle of water in some places (I mean, I once paid $5 for a single bottle of water at a music festival).
However you see it, the investment is tiny, minuscule compared to value you can create with a blog.
Just one more thing before we get started…
Of course, once your blog is live, then comes the real ‘work’ of blogging – you need to come up with a monetisation strategy…
We will get to all of that soon, don’t worry, but first you need a blog.
So let’s get started!
There are a number of ways to start a blog but your best option is to go with a self-hosted WordPress blog as this will give you the most control over the content you publish and how you choose to monetise.
WordPress.org is what most serious bloggers and businesses use, and what storyv.net is built on.
Stay away from free blogging platforms such as WordPress.com (same same but very different) because they are extremely limiting when it comes to all aspects of running a profitable business.
To Get Started, Here’s An Overview Of The Quick Steps We’ll Be Going Through To Start A Blog:
1: Choose your domain name
2: Buy your domain name and set up paid hosting (don’t worry this is cheap)
2.1 – 2.13: Bluehost/WordPress set-up steps
3: How to publish content
4: How to install and use plugins
5: How to install and customise themes
6: How to build an audience
7: How to monetise your blog
How To Start A Blog – Step-By-Step Guide
Step 1: Choose Your Domain Name
The domain name of this blog is storyv.net. This is where people find us online – like an online address.
Choosing a good domain is difficult, especially with the millions of blogs floating about the world wide web…
But here’s a tip – keep it short, so that it’s easy to remember and type directly into the browser if needed.
Also make sure no-one else has the other common extensions of your chosen domain name, for example, storyv.org or storyv.net. If someone does have the .org or .net, it’s quite likely they’re not using it, so you can contact them directly to buy it off them in order to keep your branding strong.
I would also suggest doing a search of all the common social media sites – Facebook, Instagram, Twitter, Youtube, Pinterest, Snapchat, Linkedin, Google +, etc, to ensure nobody else is using your desired name as their handle.
More often than not, someone with a private account and 3 followers on Instagram is using it, which really sucks, but you can always use a variation of your name. For example, on Instagram we are @storyv_com.
Fortunately, the hosting company I’m about to recommend in step 2 provides you with a free domain for a whole year and then usually only costs about $11.99 per year after.
You can check if the domain name you want is available using a site like https://domainr.com/, however no need to buy there because you can it all at once in the next step.
Step 2: Set Up Your Website Hosting
Now you’re going to begin the creation of your website/blog by finding it a space to live in the cloud, a server which will store all the information associated with your domain.
It sounds technical, but it isn’t really and to be honest, you don’t need to know much about any of that because your hosting company will handle it all.
There are a number of hosting companies you can go with however, based on our experience, Bluehost offers a good (and cheap) service for new websites.
For most people, Bluehost is the ideal hosting option when starting a website from scratch for a few different reasons…
» It’s one of the largest and most respected web hosting providers in the world
» They offer an anytime money-back guarantee
» They are super affordable
» When you register for one year or longer, you get a free yearlong domain name
» Support is available 24/7 via phone, chat, and tickets – based in the US
» Bluehost is for the non-techys – it’s super easy to use
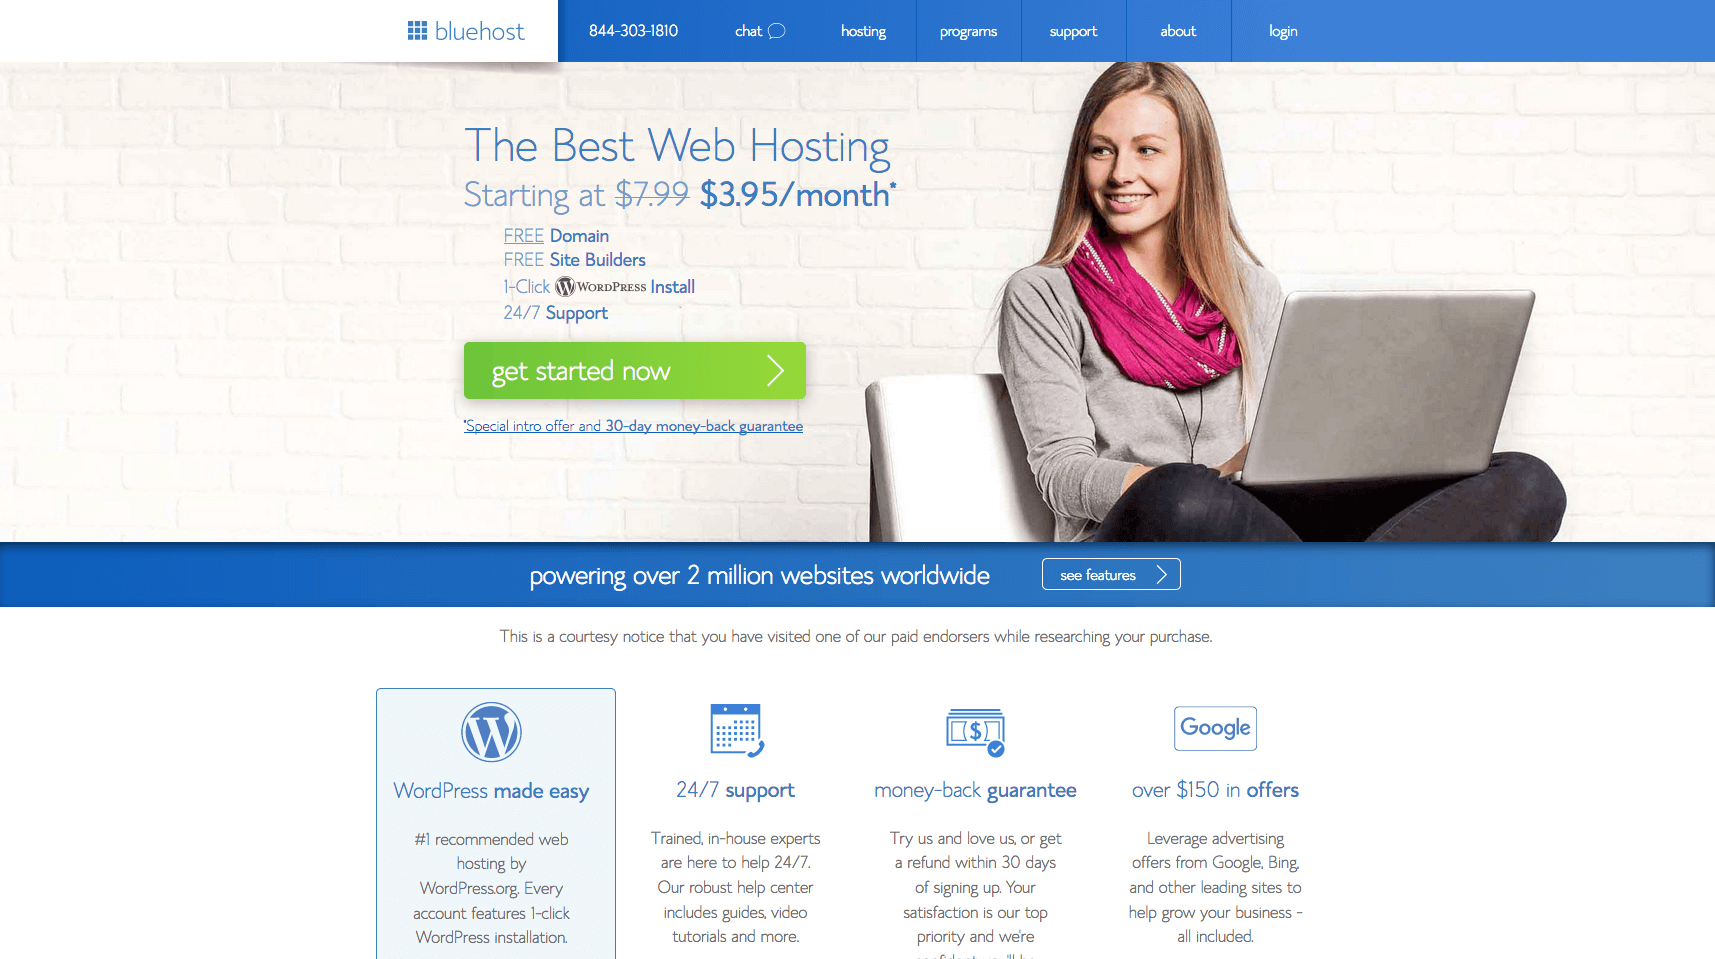
Step 2.1: Click Green Button To Get Started
Click here to open our Bluehost affiliate partner page (same link as above) and then hit the “Get Started Now” button. Here’s what it should look like on your screen…
Once you’ve hit the green button to get started you’re going to…
Step 2.2: Choose Your Hosting Package
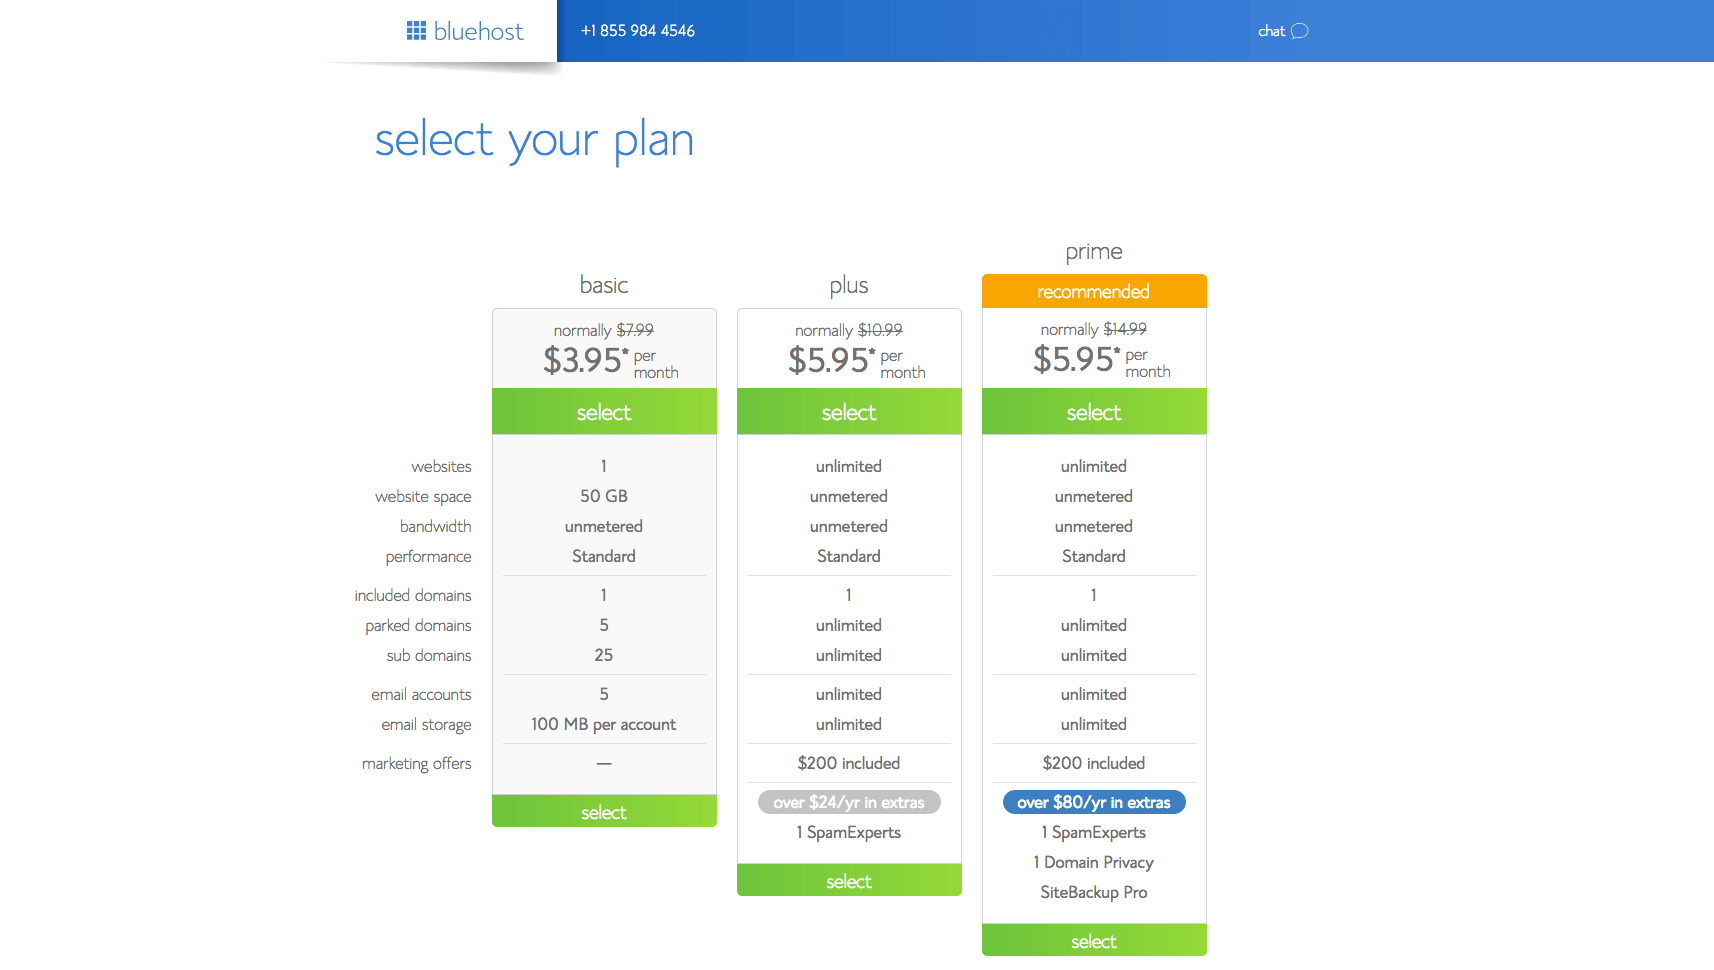
Now you’re going to choose your blog hosting plan. There are 3 main options and a 4th more exclusive option, depending on your budget and what you’ll be using your website for…
The ‘Basic‘ plan starts at $3.95 per month and then there are the ‘Plus‘ and the ‘Prime‘ plans which are both $5.95 per month.
If you can afford it, go for the ‘Prime’ plan because it gives you a lot more protection than the others, including unlimited storage, site backup, and domain privacy.
There’s also the ‘Go Pro‘ plan, which includes everything in the ‘Prime‘ plan plus a high performance server and more, but considering you’re only just starting out, I don’t think you’ll need a plan like this for a little while.
If you’re on a tighter budget and just want to test the water, by all means go ahead and choose the ‘Basic’ plan. You can always upgrade later if needed.
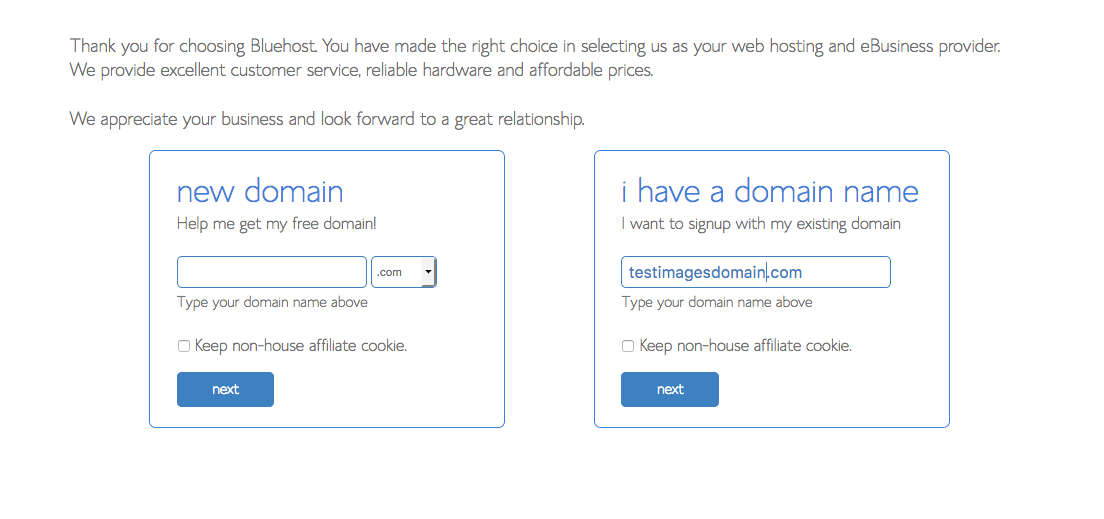
Step 2.3: Order Your Domain Name
Now you’re either going to do one of two things:
1) Enter the domain name you have chosen – but not yet bought – on the left or…
2) Enter the domain name you may have bought elsewhere on the right.
This is an easy yet exciting process because you’re about to give your blog a permanent name and address!
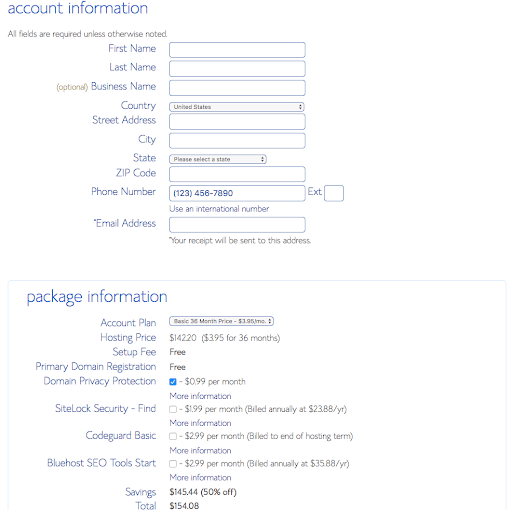
Step 2.4: Details
On this page you’re going to enter all your personal details.
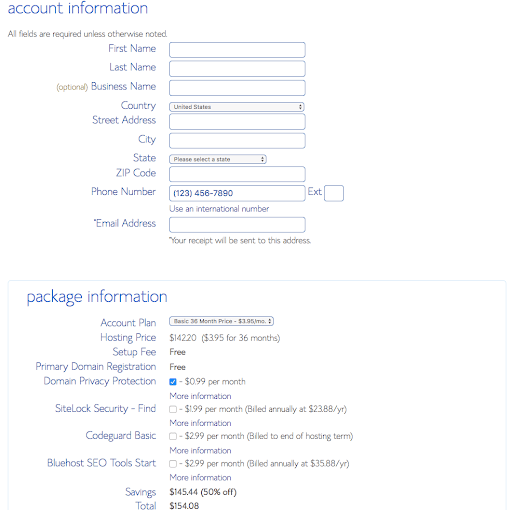
Step 2.5: Confirm Your Plan & Extras
Now you’re going to confirm the plan you want to use and go through and choose any extras you might need. These extras are optional, however, if you choose the ‘Basic’ plan, it is recommended to get domain privacy.
It’s important to note that to get the cheapest monthly rate, Bluehost is going to quote you the total investment amount for 36 months. The amount is charged up front so they can provide you with great service at such a small price.
If you’re just testing the waters and the upfront investment for 36 months is out of your initial budget, you can change it to 12 months, however the monthly investment will be a little bit more.
If you change your mind for any reason, you can cancel and get a refund within 30 days, so there’s no risk. And to be honest, I always like to pay upfront and get it all out of the way so I can focus on more important things.
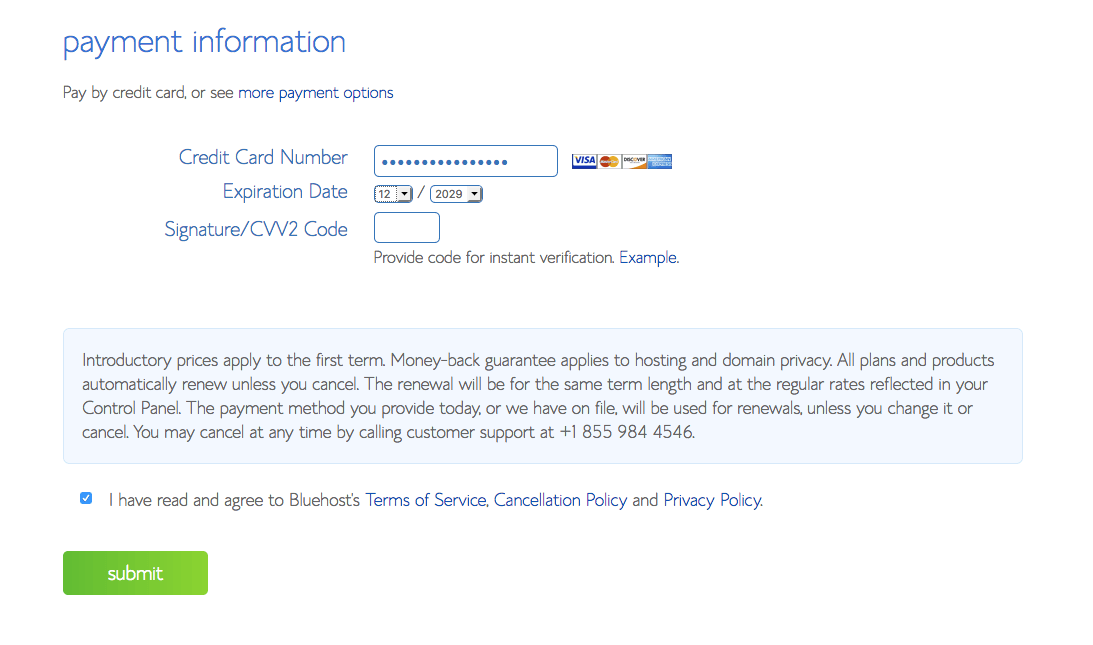
Step 2.6: Billing Information
Here you’re going to enter your billing details which will complete your web hosting registration.
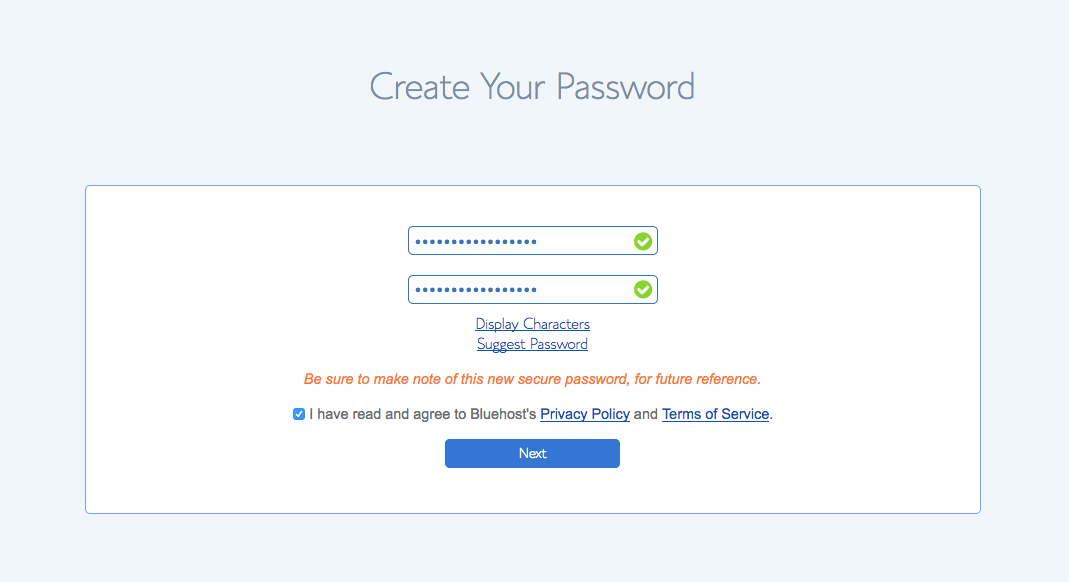
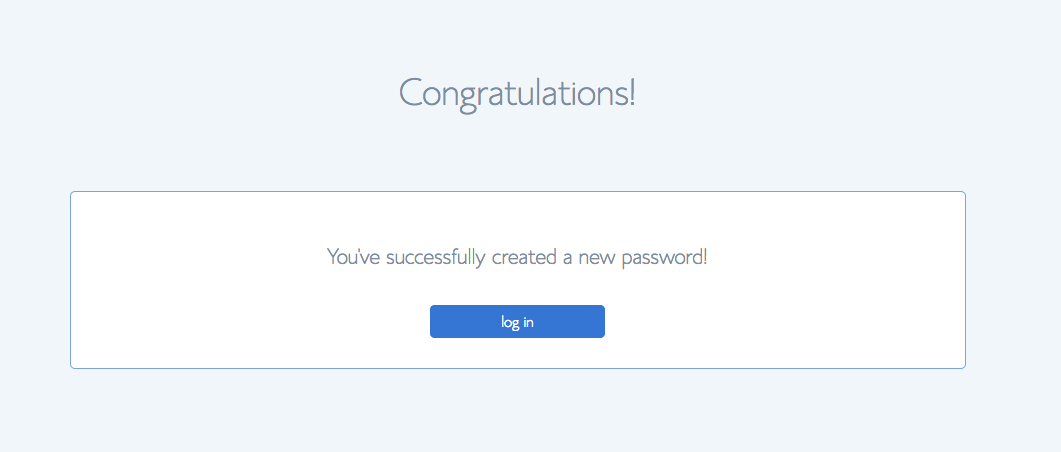
Step 2.7: Password
Now you’ll be prompted to create a Bluehost password. Click the blue button which says ‘Create Your Password’.
Choose a secure password (I recommend using a password generator like LastPass).
Click the box to agree to the terms of service.
Click ‘Next’.
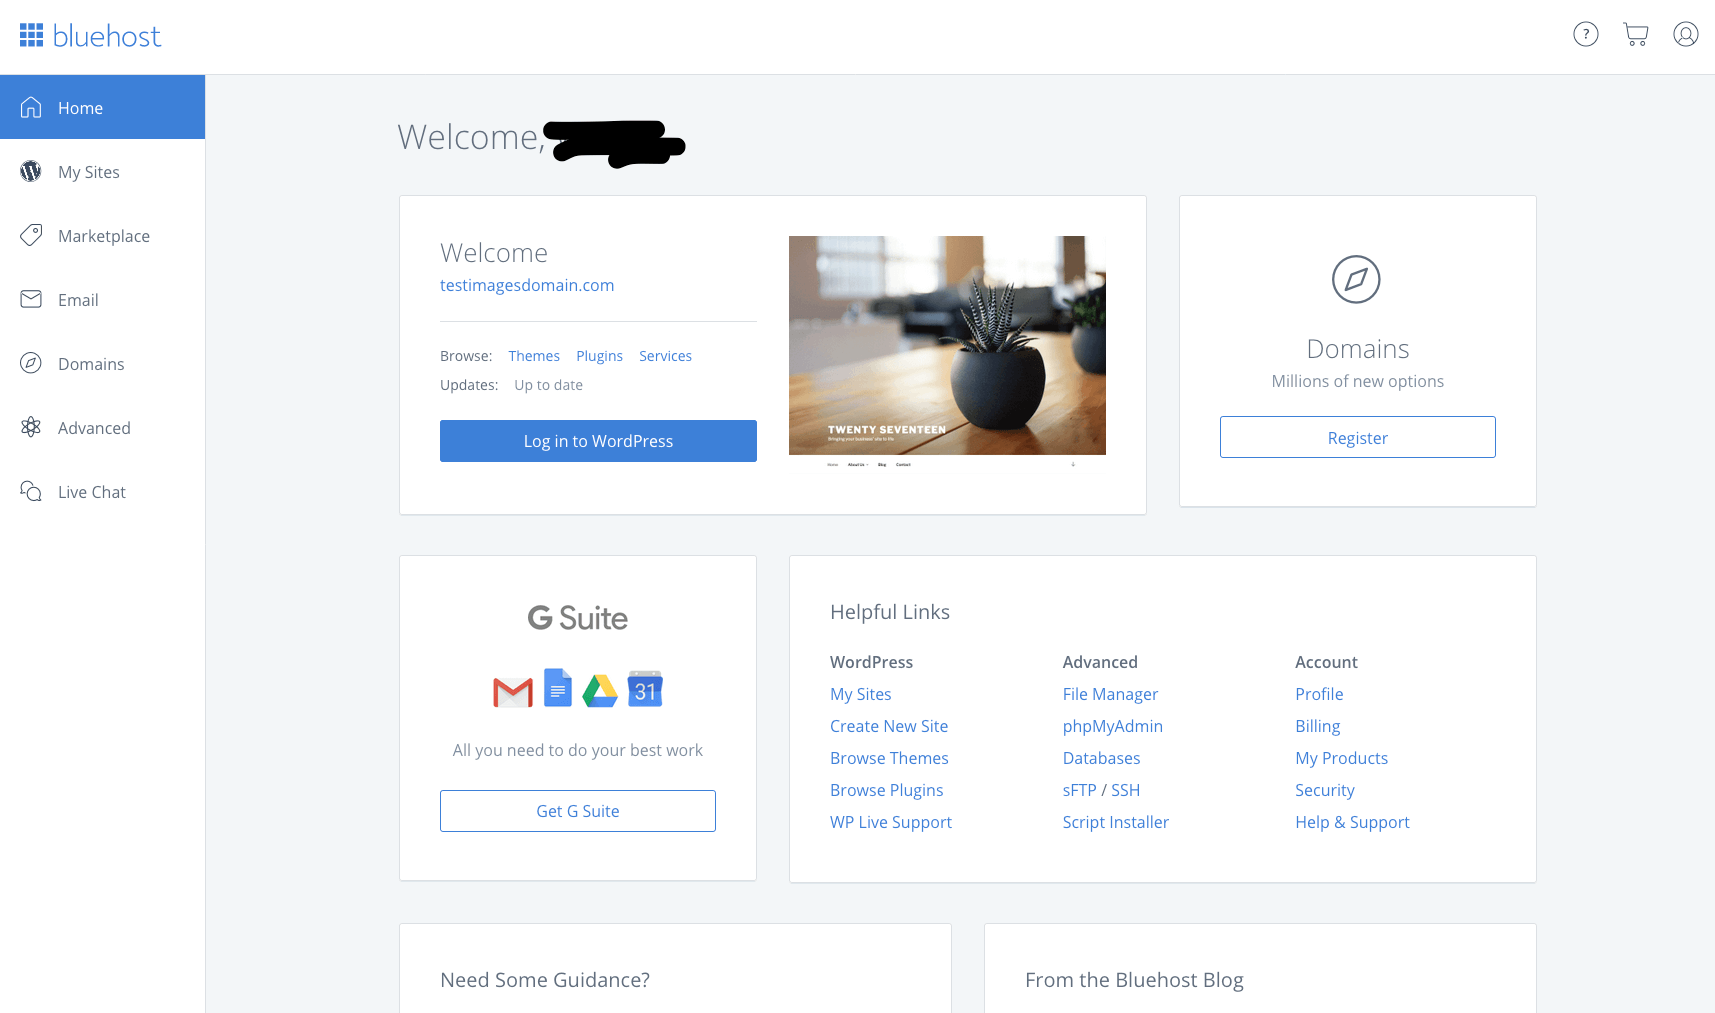
Step 2.8: Login To Bluehost
Now you can click the ‘Login’ button to enter your new Bluehost account.
Step 2.9: Install WordPress
Now you’re going to install WordPress.org with a single click.
WordPress.org is the CMS (Content Management System) you will always use to create anything on your site. Think of it as the back-end of your site (but don’t go thinking about thousands of lines of code and crazy technical stuff).
WordPress makes it so easy to blog and you’ll see why over the next few steps.
Basically, it provides you with a ‘fill-in-the-blanks’ style template which will present itself on the front-end (what people see) however you choose with the use of a theme.
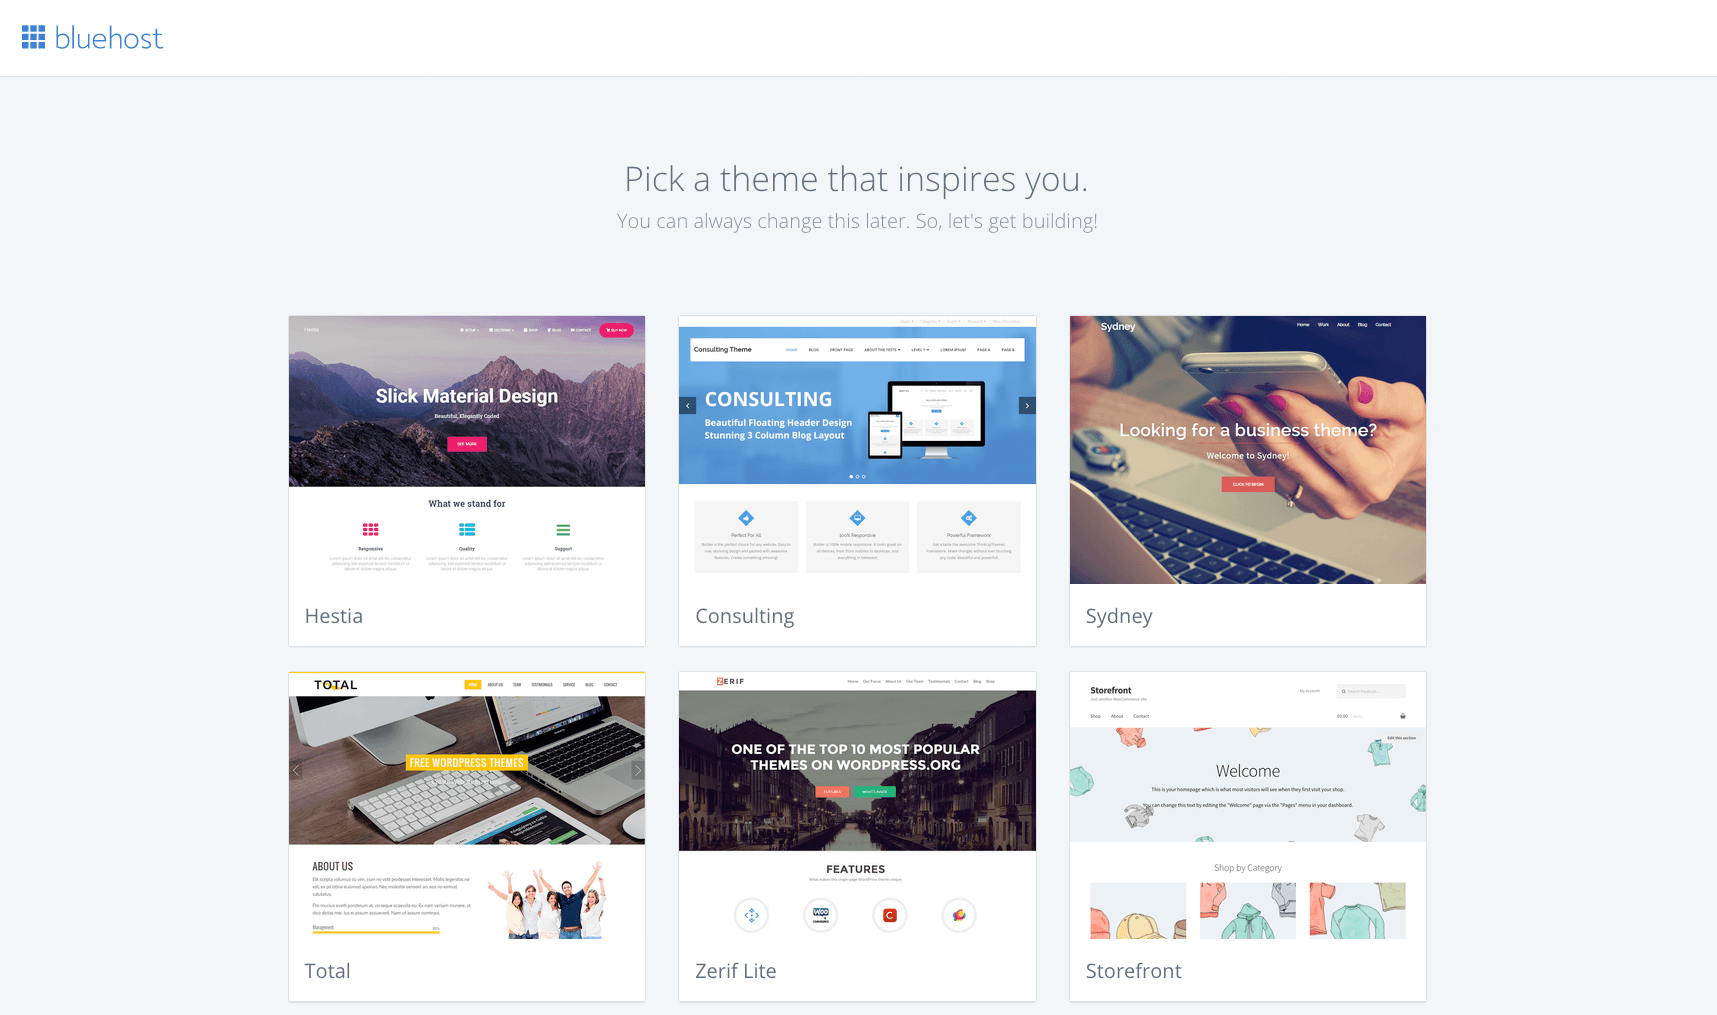
So now Bluehost is going to prompt you to choose a blog theme. This is how you’re blog is going to look to the public.
Most free themes presented to you there are fairly customisable(ish), however, I highly recommend upgrading to a premium theme later on for full control over how your blog looks and performs.
For now, just choose one that stands out to you but don’t spend too long on it because 1) no-one even knows your blog exists right now (apart from maybe your mum and your dog) and 2) you’ll want to upgrade to a better performing theme soon anyway.
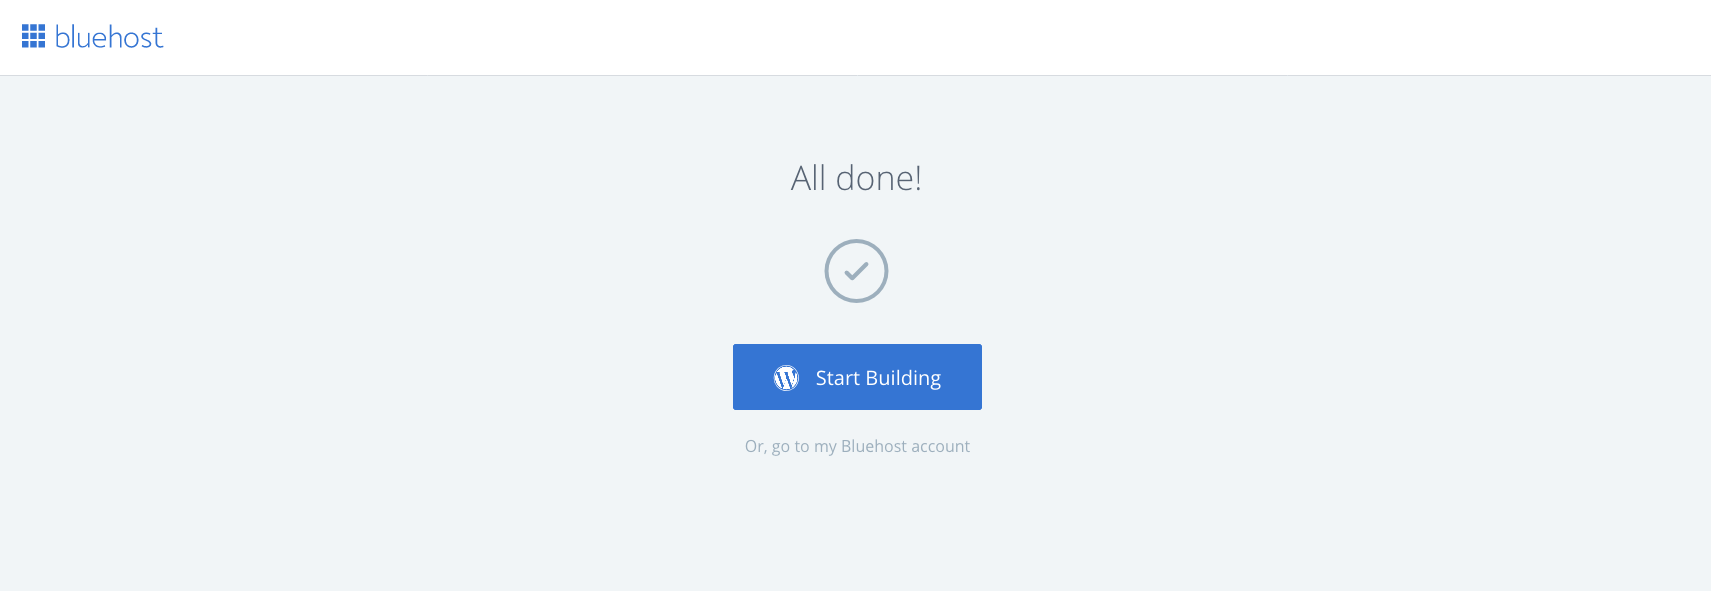
Step 2.10: Start Building Your Blog
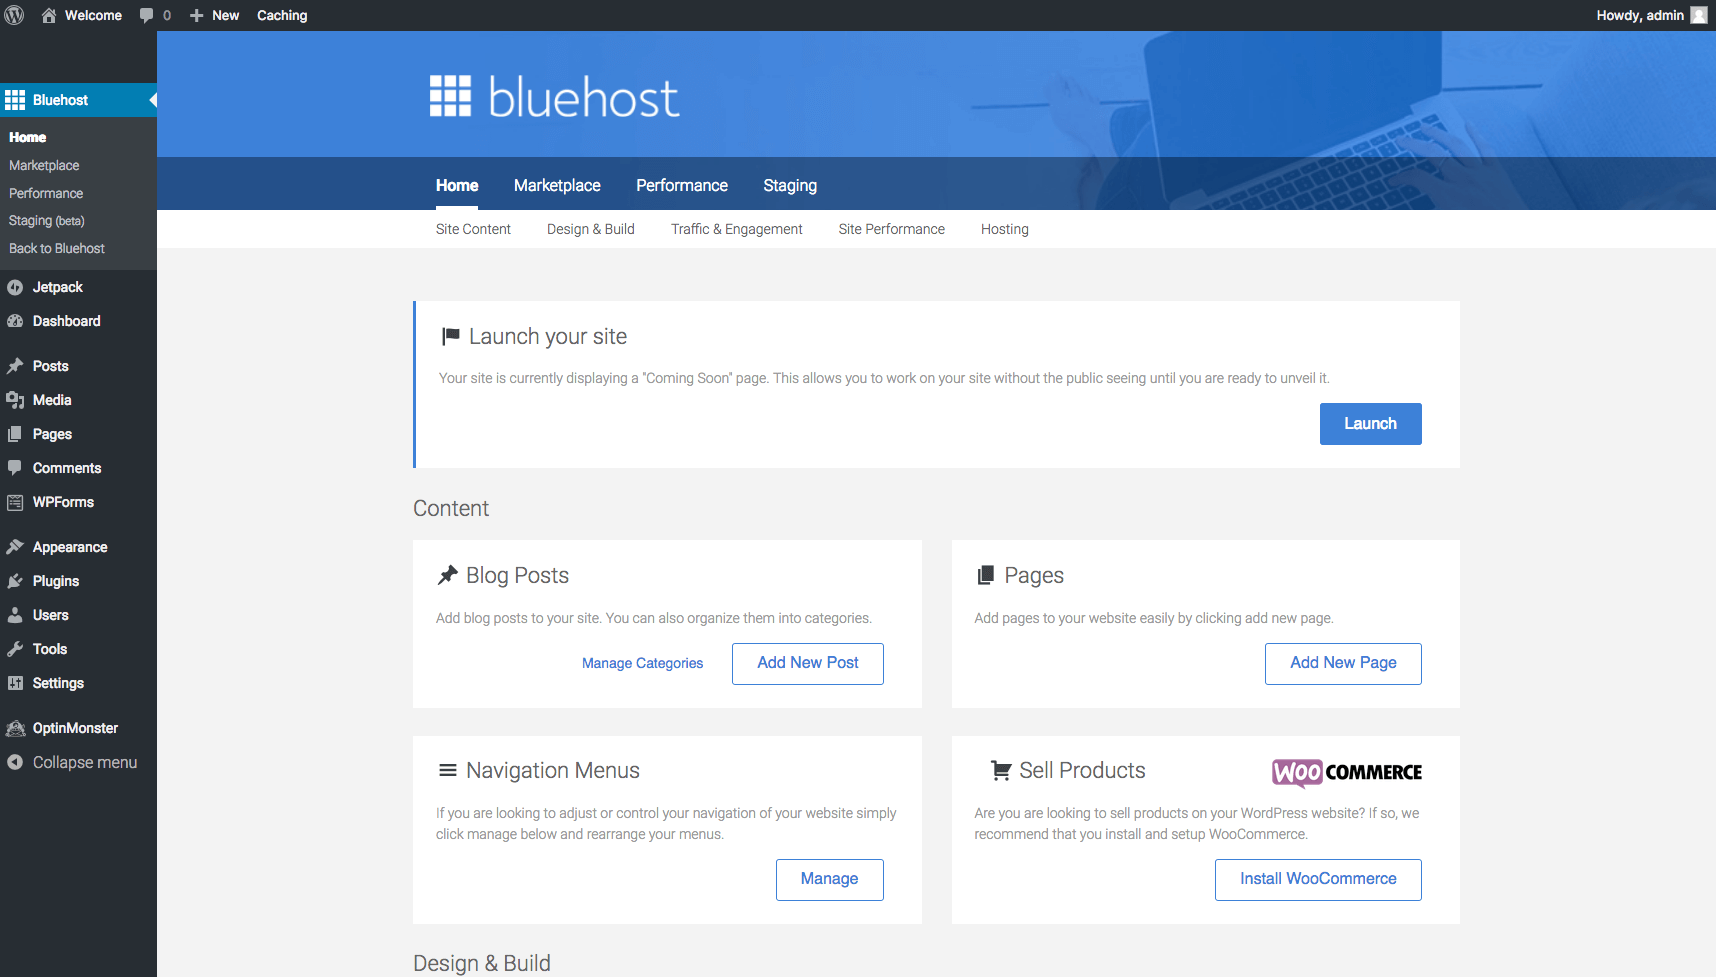
Now comes the fun part! Click ‘Start Building‘ and you’ll be taken to your WordPress dashboard where you can begin creating your masterpiece!
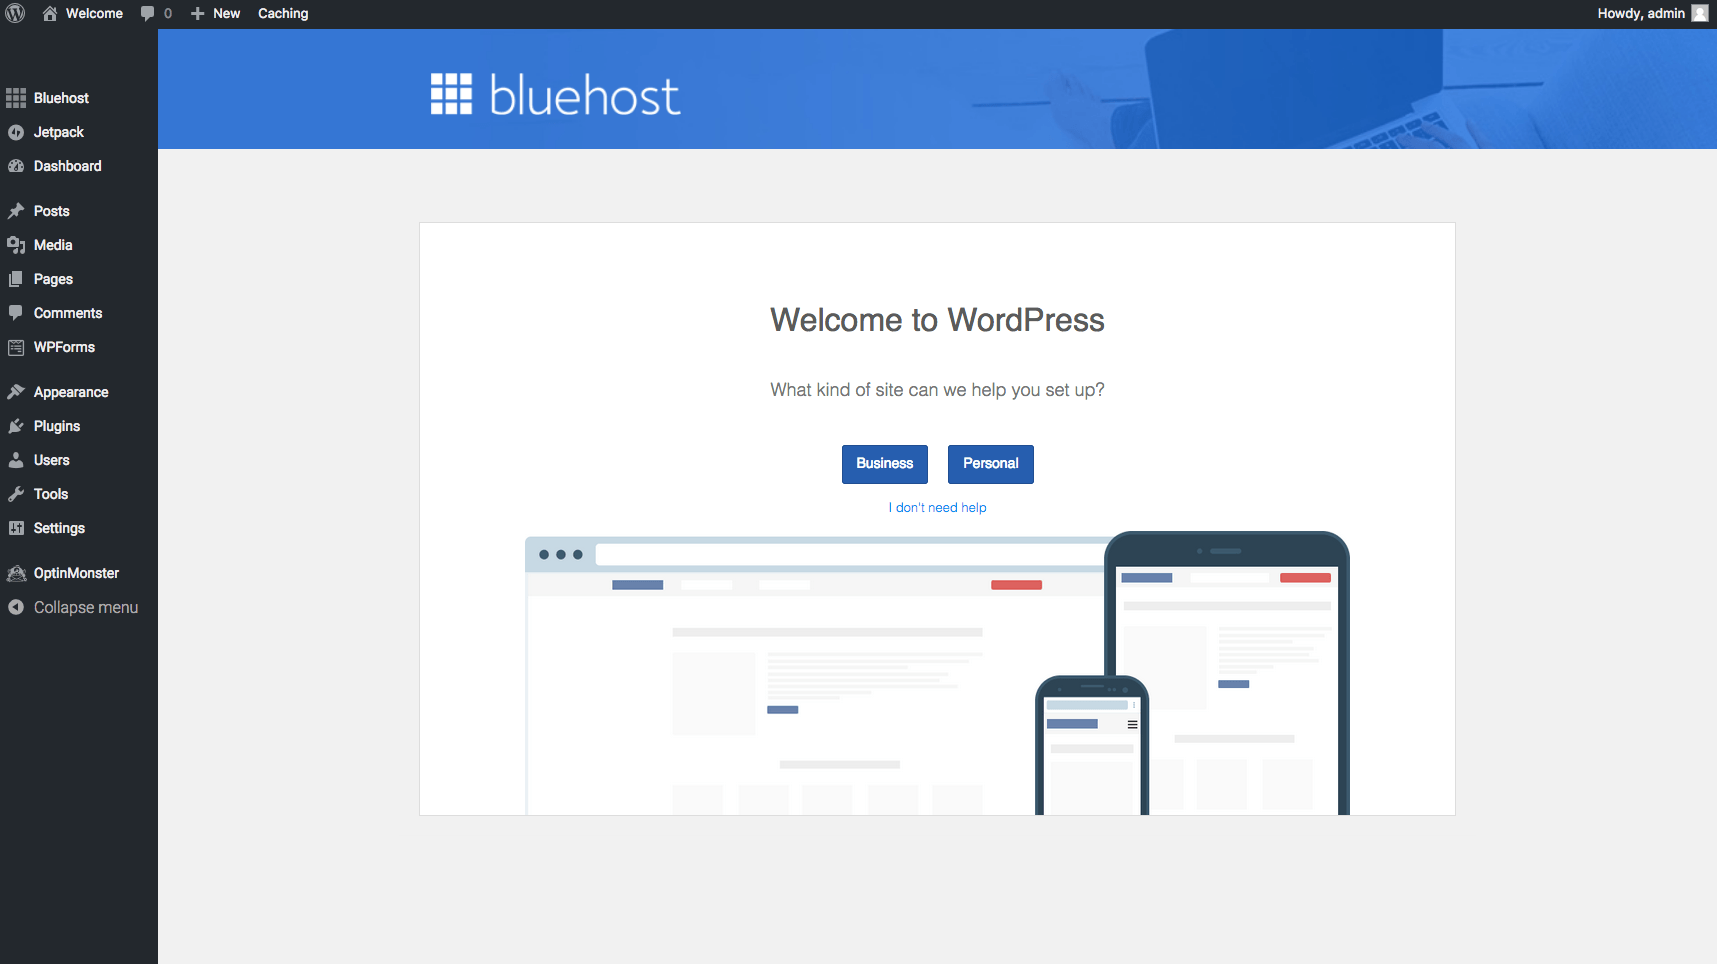
Step 2.11: Your WordPress Dashboard
Welcome to your WordPress dashboard! Get used to this place because to ensure your blog BOOMS, you’ll be investing a whole lotta time here!
Click ‘Bluehost‘ in the menu at the top left of your page to activate your blog.
Step 2.12: LAUNCH!
Time to hit that ‘Launch‘ button and make your site available to the world…
Get ready for thousands of people to visit and see what you’re doing!
Just joking… No-one even knows it exists yet apart from your mum and your dog, remember?
So don’t stress, you have plenty of time to make your site acceptable for public viewing.
You see, running a popular, profitable blog takes marketing. A lot of it…
So if I were you right now, instead of spending way too much time banging your head against the table over logo design and which fonts match, start learning the ins and outs of digital marketing ASAP.
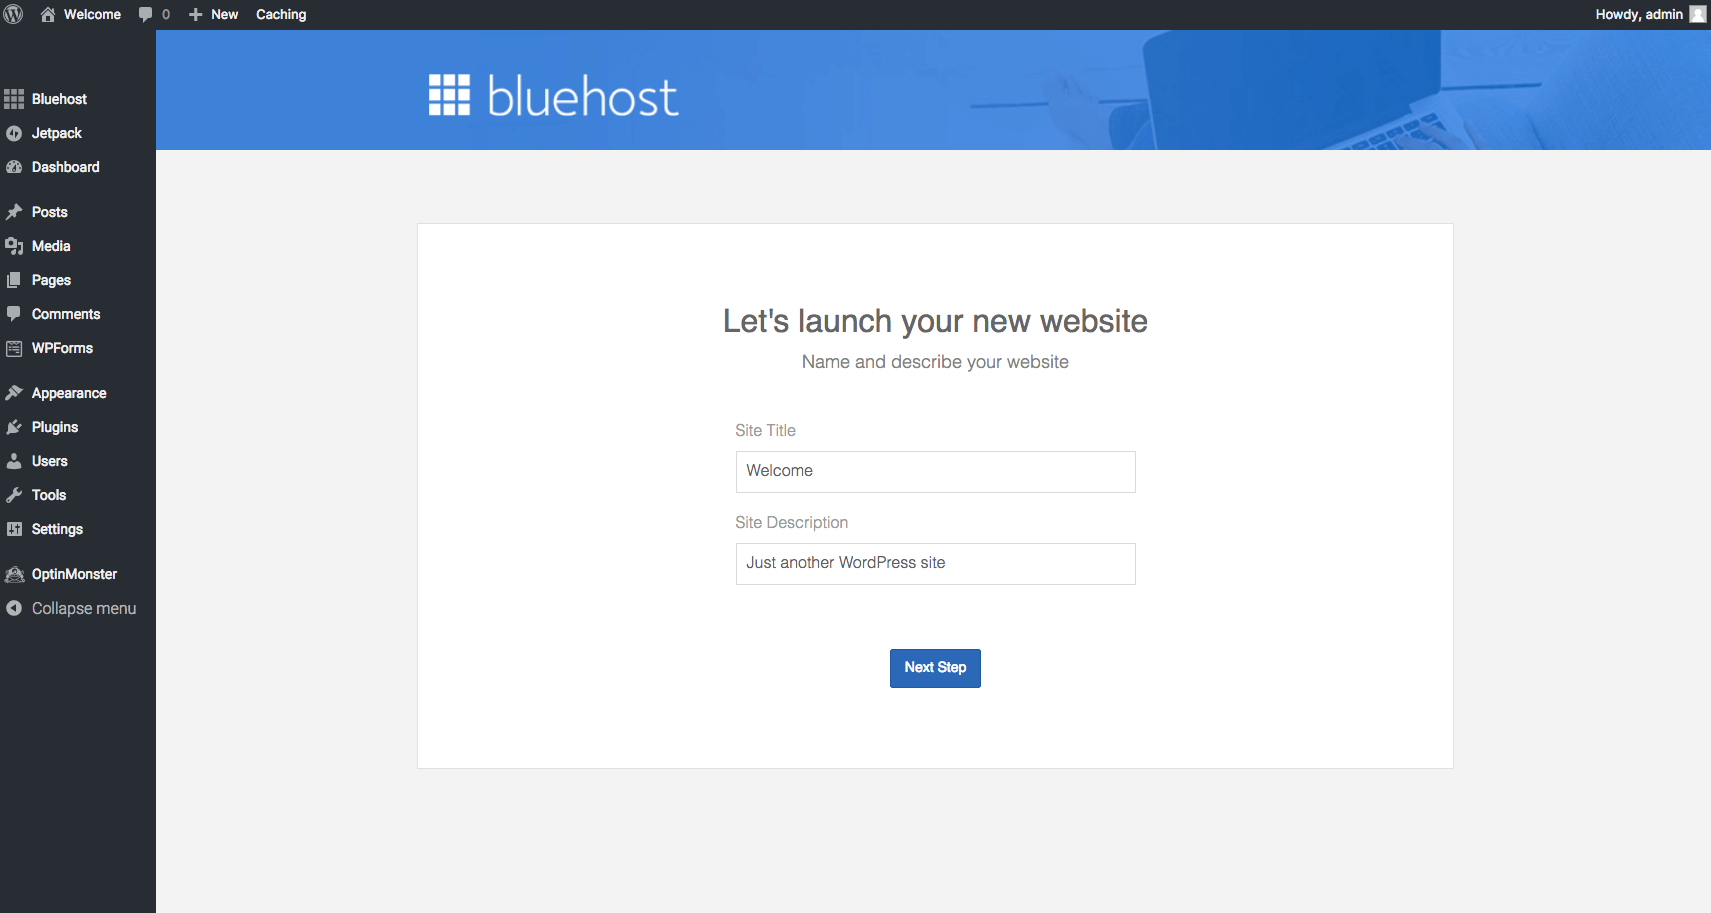
Step 2.13: Name It
Now it’s time to give your brand new site a title and tagline!
Your title will probably be the same as your domain name (except with spaces between the words) and the tagline will be a small, catchy phrase that sums up the idea of your website.
And You’re All Done Setting Up Your Blog With Bluehost! Now Let’s Learn WordPress…
From WordPress you can manage pretty much everything to do with your blog. Generally speaking, you won’t need to go to Bluehost unless you want to upgrade your plan or manage something to do with your hosting.
So now click ‘Login to WordPress‘ to start editing your site!
Here’s a quick tutorial to show you around WordPress:
3: How To Publish Content Using WordPress
Now that you have all the main bits set-up, now’s the time to start creating static pages on your blog, for example your about, contact and resources pages.
Once you’ve got all your desired pages set up (you can go ahead and create as many as you like into the future), it’s time to publish your first blog post!
I always find that an explanation detailing what your site’s about, how it’s going to help your readers and what you plan to do with it moving forward makes for a great first blog post!
And just to clarify, the only difference between a page and a post is that a page is static and a post is not…
So when you write a new post, the one’s before it will move further down the page, whereas pages can be set-up to stay in your menu or somewhere they’re always going to be seen.
Here are 3 quick tutorials on creating pages, posts, categories and tags:
4: How To Install And Use Plugins
Along with your website theme, you can install plugins which will help to customise your site even further as well as add extra functionalities, keep your site secure and ensure everything runs smoothly.
There are some essential plugins I recommend using on your blog. Here are some of the ones we use:
» Akismet Anti-Spam: This protects your blog from spam. Very important!
» EWWW Image Optimizer: Reduces image file sizes to ensure your site loads quickly
» Instant Articles for WP: Turns your article into an instant loading Facebook article when viewed on Facebook
» Jetpack by WordPress.com: Offers a suite of tools that can normally only be used on the free blogging platform
» Metronet Tag Manager: Integrates Google Tag Manager into your website (allows you to gather most of your tracking codes in one place)
» Redirection: Helps to manage all of your 301 redirects and monitor 404 page errors
» tagDiv Social Counter: This is what we use to display our social media numbers in the sidebar
» Thrive Leads: Helps to build our email list using pop-ups and lead captures (important!)
» WP Rocket: The most powerful caching plugin designed to help your site run faster (important!)
» Yoast SEO: An all in one WordPress SEO plugin which handles the complete technical optimization of your site for search engines
If we had a basic theme, we’d probably need a lot more plugins running than this…
For example, one plugin to display our Instagram feed, another plugin to add image banners in our side-bar, another plugin to include related posts at the bottom of a post, etc.
But because we paid for a premium theme through ThemeForest (the one we’re using right now is called ‘Newspaper‘), it comes with so many customisable features that we don’t need to go and add all sorts of different plugins.
So keep that in mind when you’re choosing a theme because the more plugins you use/activate, the more weight you put on your site which can cause sluggishness and site crashes.
Yes, sometimes plugins can clash with one another and break your site until you de-activate them one-by-one and figure out the culprit. Generally you’ll have to remove the one causing issues and install something similar.
Here’s a quick tutorial on how to install and use plugins:
5: How To Install And Customise Themes
As you know by now, WordPress does provide some free themes, however, they are generally quite basic without much legroom for customisation.
Instead, I recommend investing in one really good premium theme on ThemeForest (they can range anywhere from about $10 to a few hundred dollars).
ThemeForest has tons of amazing themes that’ll be able to make your site look and perform exactly how you want.
We’ve used a couple of different themes in the past but none of them have had the capabilities this one we’re using now has – just do a search for ‘Newspaper’ and check out the preview.
To find your ideal website theme on ThemeForest, click on ‘WordPress‘ in the upper left section of the page. You can then choose your theme type and begin wandering through literally thousands of themes.
» Click Here To Pick Your Website Theme
Important note: When making your decision, ensure that the theme is both mobile responsive (meaning it changes to suit the device you’re reading from) and super fast. These are 2 aspects Google pays very close attention to. If your site isn’t optimised for mobile or takes ages to load, you’re going to find it very difficult to rank well on search engines.
Once you’ve purchased your new website theme on ThemeForest, you’ll be able to download it to your computer as a zip file.
Then to upload your new theme on WordPress, go to your dashboard side-panel and follow these easy steps…
» Appearance
» Themes
» Upload A New Theme
» Then upload the zip file
Here’s a quick tutorial on how to customise your theme:
At this point you can also go ahead and organise your website menus.
Generally, you’ll have a main menu and a footer menu (but we also have one in the header as well).
Your main menu might include the main categories of your site, your products/services, and if you have space, your about and contact pages.
We ran out of room so I created a header menu for our ‘contact’, ‘write for us’ and ‘advertise’ pages.
Then in the footer menu you can have your terms of service and legal info.
When building your blog you also have what are called ‘widgets‘.
Widgets are small blocks which perform specific functions. For example, you can add a widget to your side-bar which displays a clickable image. Or you can add a widget to the end of your post which displays an email opt-in form.
Here’s a quick tutorial on how to organise your menus and widgets:
6. How To Create And Manage Users
In WordPress you can create users who have different levels of access.
For example, you would be an ‘admin’ and have full access to everything in the back-end, however, if you hire a writer, you would add them to the system as an ‘author’ or ‘contributor’ and they would only be able to do certain things like create a post.
Here’s a quick tutorial on how to create and manage users:
7: How To Build An Audience
Take note: This is the most important step in the whole process of starting a blog (apart from literally starting it) – how to market your blog and build an audience.
So much comes into play when you consider ‘what is effective digital marketing?’, however, while you’re not going to learn it all overnight, it is important to have some kind of fundamental knowledge about SEO, email marketing, copywriting, social media marketing, advertising and networking.
You can study all of this separately by doing a simple Google search but it’s hard to know what’s what, who’s talking truth and who’s talking bullsh*t, what’s actually important to take in and what’s not…
In which case, you might feel more comfortable taking an online course. This complete digital marketing course on Udemy is a low cost option that will give you a basic insight into digital marketing.
If you want something more in depth, a course that takes you by the hand and shows you exactly how to make your blog a total success rather than a total flop, then don’t go past Nomadic Matt’s Superstar Blogging course. While this course is predominantly based around travel blogging, the lessons can be applied to any kind of blog.
Here are 2 quick videos on how to market your website and attract an audience:
8: How To Monetise Your Blog
Finally once you know all the ins and outs of WordPress, how to start blogging and where to find your audience, it’s time to put a monetisation strategy into place!
Many bloggers don’t start making money from their blog for at least the first year, mainly because their traffic isn’t high enough to warrant putting ads all over their site (for such a small return).
However, there are many other ways to monetise your blog apart from banner ads and you can get started right away with the help of SEO, Social Media, Facebook Ads and Email Marketing.
You do not need to be receiving thousands of people on your site organically (that is, through search engines) or through social media to start making money blogging!
That’s why platforms like Facebook Ads are such a freaking blessing!
To understand more about how to make money blogging, I put this detailed post together which outlines all the main ways people are doing it and how you can too:
Travel Jobs: How To Make Money Blogging From Anywhere?
You may also find it beneficial to enrol in an online course like Nomadic Matt’s Superstar Blogging course to learn the ins and outs of turning an average blog into a highly successful online business.
Annndd you are set my friend! Well done! You have successfully jumped over the first hurdle towards becoming location independent and officially started your blog. Let the fun begin!
If you have any questions at all I’m here to help you out. My inbox tends to fill up fast these days but if you leave a comment below I will definitely see it.
And if your blog is up and going, comment below with the link to your first post so we can all check it out!
Until then, start getting used to your new title as ‘blogger & digital entrepreneur‘!
PS. I made a video for you »
If you need just a little bit more inspiration to nudge you over that fence you’re sitting on and start a blog today (with the limited time bonus), I made this video for you – 7 Powerful Reasons To Start A Blog (some might surprise you!).
If you haven’t already started your blog, I definitely recommend grabbing a cuppa and taking 5 minutes to watch it!
Further Reading & Resources About Blogging & Traveling:
» Travel Jobs: How To Make Money Blogging From Anywhere?
» 5 Ways Blogging Can Help You To Travel More
» Travel Jobs: How To Create And Sell Digital Information Products (And Earn Well)
» 7 Full Time Travelers Explain How They Earn Money Online
» Travel Jobs: Exactly How We Make Money Online While Traveling
» Travel Lovers: These 7 Reasons To Start A Blog And Make Money From It Will Make You Think
» 16 Digital Nomad Jobs For People Who Want To Travel The World
» Get Paid To Travel: 101 Amazing Travel Jobs That Let You Work And Travel Overseas
» 15 Awesome Travel Job Courses That Will Teach You How To Work From Anywhere
What goes around comes around… If you enjoyed this detailed guide on how to start a blog, please share it with someone you think will benefit from it! 🙂
Save this start a blog guide on Pinterest:

Note: assume each link in this post is affiliated, meaning I will make money in some way if you purchase products through my blog or recommendation at no extra cost to you – in fact you often end up getting an awesome discount! My mission is to help 1,000 people travel more by next year – this just helps to cover our website costs. Thanks!


